Sharing my love of Taiko
Saturday, August 11, 2012
Fue!
For a lot of kumi daiko groups, fue are a way to add melody to the rhythm and increase the depth and appeal of their performance. Though I never play during performance (then I wouldn't get to drum! I've begun to get more fond of the idea of playing fue with the group, however. Maybe just one song . . .) I have played and made fue for years. Don't misunderstand. I'm hardly an expert. More so just an avid enthusiast. I thought it might be interesting to put some of my fue exploits here along with the drums.
I tend to make flutes in batches. Since I buy my bamboo in ten foot lengths it's just not convenient to to leave them in one piece (difficult to store). I measure the inside diameter of one end of the bamboo stick with a caliper, making sure I'm not measuring at a node where the inside diameter narrows, then using this as a bore size, I measure the length of a flute plus the additional length of the head and add another few inches for errors in calculation, mark it and cut it off . Next I measure the inside diameter of the remaining long piece and complete the whole process again until I have cut the whole ten feet into flute longish segments. That will be a 'batch' of flutes.
You may be asking yourself "what's the length of flute?" That's determined by multiplying the diameter of the bore by 23. The length of the head just has to be enough for you put the stopper in the flute. Past that it's only a matter of personal taste. You can make it longer or shorter, whatever's comfortable. Then, as I said, add some at the bottom to allow for errors. Here's a diagram to help clarify.
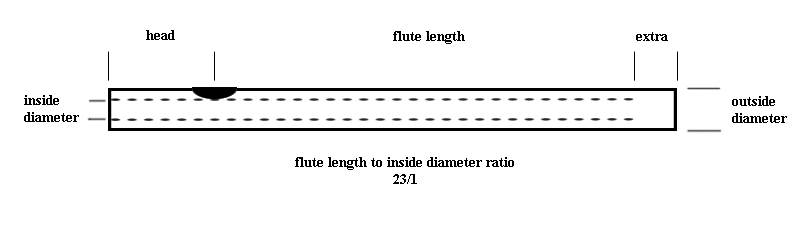
I do all my measuring in metric. It makes the math a whole lot easier.
Once I have all the lengths cut I use a steel rod to knock out the intra-nodes. (that's just a fancy way of saying the interior walls that prevent bamboo from just being a tube). Once they're knocked out I grind them down to smooth out the bore of the flute. I start out with nothing more than a threaded rod I picked up at the hardware store, then I move on to 60 grit sand paper affixed to a dowel or rod. I spend a fair amount of time with the coarse sand paper to make sure the bore doesn't get narrow where the nodes are.
Now that I have a bamboo tube with a fairly straight sided bore, I shave the nodes off the outside. I just take my trusty block plane (the one I use for drum bodies) and carefully shave down the nodes until the outside of the tube is fairly smooth. You have to be careful because bamboo splits in long splinters along the grain, and if you dig too deeply with the plane it can tear big chunks out of the body of your flute. When the nodes are evened out I sand out the tool marks with that same 60 grit sand paper. I end up with a pile of proto-flutes that look something like this.
Saturday, July 28, 2012
Practice Pads
I live on a 23 square mile island. A better way to think about it is that it's approximately five miles on a side. (it's not square, but this is for purposes of conversation) The point being that when I or the group I belong to practice taiko most of the island can hear it. Unfortunately, not all of my neighbors love taiko as much as I do. So I needed a quieter way to practice. The solution? Practice pads!
First, I purchased a commercially manufactured practice pad. It's been great and I use it often. I also purchased a stand for it that allows me to put it up at Odaiko height and angle, so not only can I practice my rhythms, but also my form and build my endurance. In western drumming practice pads are used primarily solo, meaning (or so it has seemed to me) you use one pad and practice your rhythms and your speed. When a western drummer needs to practice his form or practice coordinating hands on different drums, etc, he just practices on his kit. In taiko a great deal of our drumming is form. Our stance, our arm movements, and how we coordinate them across multiple drums or with multiple drummers is just as important as the rhythm. This, combined with my need to not aggravate everyone who lives close to me, made me consider a different approach. Though my one, commercially manufactured pad was good, I decided that I need multiple pads to be able to practice properly. Commercially manufactured pads are reasonably priced if you need one, but when you need ten all of a sudden they seem very expensive, so I thought I'd try to make my own.
This is what I did:
First, I went to a local discount store and purchased a yoga exercise mat. I got the thickest, spongiest rubber mat I could find. It cost me twelve dollars.
Next, to the hardware store to get a half inch piece of plywood. The commercial pad I own uses a high density particle board for a base, so I would assume you could use something similar to that as well.
I decided to make my base boards with twelve sides, just like the commercial one I had. I cut the plywood into twelve inch squares, then I went to this website:
http://www.calculatorsoup.com/calculators/geometry-plane/polygon.php
and calculated the angles and measurements I would need to lay that out. I cut off the corners and ended up with something that looks like this.
I sanded the corners and edges to round them and prevent slivers. Next I cut a circle out of the yoga mat using a rotary cutter and a cutting mat. I made the radius of the circle about three eighths of an inch shorter than the short radius (from the center of one of the flat edges to the center of the board) of the baseboard.
I then applied glue to the back of the rubber circle.
I used Loctite Stick 'N Seal. I won't be able to tell you how well it held up until after I've been using these pads for a while, but it seems to hold well. I've used it on other things without any problems.
I then took the rubber pad and pressed it to the plywood base board, but not too hard. Then I pulled it off again. This left glue on the base so I could see where the pad was going to adhere.
I took a spreader and smeared the glue on both surfaces to apply an even coat. I was careful to get right up to the edge on the rubber pad.
The glue is like contact cement in that you apply it to both surfaces, allow it to "tack", then press both surfaces together. I let the glue set for about ten minutes, then carefully pressed it on to the baseboard, making sure to align the two circles of glue. I stacked some boards and stuff on top of it to apply pressure and let it dry overnight.
The conclusion to the story is I was able to make numerous practice pads that have decent action and good return (they act like drums when you hit them with a stick) for less than five dollars a piece. Now I can practice complex taiko compositions that move across multiple drums without having to move out in the middle of the desert somewhere.
First, I purchased a commercially manufactured practice pad. It's been great and I use it often. I also purchased a stand for it that allows me to put it up at Odaiko height and angle, so not only can I practice my rhythms, but also my form and build my endurance. In western drumming practice pads are used primarily solo, meaning (or so it has seemed to me) you use one pad and practice your rhythms and your speed. When a western drummer needs to practice his form or practice coordinating hands on different drums, etc, he just practices on his kit. In taiko a great deal of our drumming is form. Our stance, our arm movements, and how we coordinate them across multiple drums or with multiple drummers is just as important as the rhythm. This, combined with my need to not aggravate everyone who lives close to me, made me consider a different approach. Though my one, commercially manufactured pad was good, I decided that I need multiple pads to be able to practice properly. Commercially manufactured pads are reasonably priced if you need one, but when you need ten all of a sudden they seem very expensive, so I thought I'd try to make my own.
This is what I did:
First, I went to a local discount store and purchased a yoga exercise mat. I got the thickest, spongiest rubber mat I could find. It cost me twelve dollars.
Next, to the hardware store to get a half inch piece of plywood. The commercial pad I own uses a high density particle board for a base, so I would assume you could use something similar to that as well.
http://www.calculatorsoup.com/calculators/geometry-plane/polygon.php
and calculated the angles and measurements I would need to lay that out. I cut off the corners and ended up with something that looks like this.
I sanded the corners and edges to round them and prevent slivers. Next I cut a circle out of the yoga mat using a rotary cutter and a cutting mat. I made the radius of the circle about three eighths of an inch shorter than the short radius (from the center of one of the flat edges to the center of the board) of the baseboard.
I then applied glue to the back of the rubber circle.
I used Loctite Stick 'N Seal. I won't be able to tell you how well it held up until after I've been using these pads for a while, but it seems to hold well. I've used it on other things without any problems.
I then took the rubber pad and pressed it to the plywood base board, but not too hard. Then I pulled it off again. This left glue on the base so I could see where the pad was going to adhere.
I took a spreader and smeared the glue on both surfaces to apply an even coat. I was careful to get right up to the edge on the rubber pad.
The glue is like contact cement in that you apply it to both surfaces, allow it to "tack", then press both surfaces together. I let the glue set for about ten minutes, then carefully pressed it on to the baseboard, making sure to align the two circles of glue. I stacked some boards and stuff on top of it to apply pressure and let it dry overnight.
The conclusion to the story is I was able to make numerous practice pads that have decent action and good return (they act like drums when you hit them with a stick) for less than five dollars a piece. Now I can practice complex taiko compositions that move across multiple drums without having to move out in the middle of the desert somewhere.
Friday, July 6, 2012
4th of July
Wow! I can't believe how long it's been since my last post! Despite neglecting my bloggish duties I have still been busy with all sorts of taiko things. Our group has some performances coming up and we've been busily preparing. For the second year we're going to be performing in our local 4th of July parade, something I heartily enjoyed last year. Last year my family and I made hachimaki to commemorate the event, so we decided to do it this year as well. I guess that makes it a tradition. Our taiko group has grown some, so we had to make a few more this year.
Saturday, May 5, 2012
The Finished Product
And here it is in all it's weird little glory! I'm mostly happy with how it turned out and I'm very happy with how it sounds. A bit like a shime but somehow richer. I already took it to class with me last week and a classmate and I spent time practicing with it. Noise was made, fun was had, all around a good evening.
I think I like the look of the painted heads a great deal. I'm sure I'll be doing more drums like this in the future.
Sunday, April 29, 2012
Kimyōna Progress
It was a long process, but I've finally gotten some heads stitched for the kimyōna daiko. I put the the heads on the drum and laced it up so it would dry to fit the body with the right head shape. Once it's dry I will take the heads off again, paint them, then when the paint's dry put them back on and tighten it all down. I'm hoping the black rims on the heads will bring it all together with a classy look. I did some tests with the paint on some scrap raw hide and was pleased with the results. Can't wait to see how it comes out!
Thursday, April 5, 2012
Nagata Shachu
It's been a while since I posted a video. This is another one of the groups I listen to frequently, Nagata Shachu based in Toronto, Canada. I love they way they play rhythms across multiple drummers, and they combine rhythms from modern, traditional and other sources in a very unique, strictly taiko way. I've discussed my love for uchiwa in previous posts, so this seemed like the appropriate piece to showcase.I've also added a link to their home page in the links column.
Enjoy!
Enjoy!
Saturday, March 17, 2012
Finished Katsugi
Here's the finished beast! I'm fairly happy-ish with how it came out. I've spent some time playing, though not a lot, and it's addicting. (and a great deal of fun!) The sound is very bright with a fair amount of sustain. It came in at right about eleven pounds, I was shooting for under ten, but I think the body straps put me over the top. It can easily be lifted with one hand, and suspending it by a strap over one shoulder is no strain whatsoever.
The heads are of a lighter (thinner) raw hide than I usually use, but I was trying to keep the weight down and I wanted to see what it would be like. I also went with 'natural' instead of bleached. It was more a matter of what my supplier happened to have when I was buying the hide, but I thought, 'what the hell. Might be cool' The lacing (rope) is offset toward one side of the drum (the bottom in the image). I saw a group recently that had all of theirs offset like that and thought I'd give it a try. It doesn't seem to affect the tuning of the heads like I thought it might, so when I re-lace it I might just go back to centered.
The body is 20 inches high, sixteen in diameter and the heads are 20 inches. While I was making it sometimes this seemed way too large, others like it was just right. It did take some practice to get to the point that I wasn't nicking the rim when drumming across both heads, but I'm getting the hang of it now. The size ultimately ended up being quite comfortable.
Subscribe to:
Posts (Atom)


