When the glue had dried on the body for the katsugi okedo I applied a little pressure to the sides to get a feel for its strength and though it felt stout it still flexed more than I was comfortable with. I decided that I should put some bracing on the inside. I thought about how exactly to go about it for quite some time. Ultimately I didn't arrive at what I thought to be the perfect solution, but decided to go with simple and easy and see how the drum held up. I cut wedges of oak and shaped each to fit a specific join on the body of the drum, wrote a number on the brace that corresponded to the joint it went on, then once all the wedges were complete glued them in place in two alternating rows around the center of the drum as measured from top to bottom.
After all the wedges were in place and the glue was dry I once again did my 'squish test' to see how rigid the body felt and there was significantly less flex. I don't know if it's going to be enough bracing or not, but I'm trying to keep the drums light so I'm hesitant to add more. I'll run with it and see how it goes.
Sharing my love of Taiko
Saturday, October 29, 2011
Thursday, October 27, 2011
Gluing Katsugi
Gluing the katsugi oke daiko took a bit more effort than the shime did. The longer and wider staves were more difficult to get into position in the first place and once in position they had small but numerous gaps between them.
First I took the large rubber bands I had used for the shime and wrapped them around staves to hold them together while I assembled all sixteen into the proper positions. Not only does this hold the drum body together while you glue it, etc, it also allows you to look at the body as it will approximately look when it's finished before it's permanent. This, before any glue is applied, is a great time to check for staves of different color that are next to each other that look bad or any other reasons you may want to change the order or flip any of your staves.
Once they were held by the rubber bands I separated them along each join one at a time, running the glue in a bead down along the stave on one side of the gap. Once the glue had spread the whole length of the stave I would press the two together and move to the next.
When I was done I had a whole lot of glue all over everything and sixteen staves in a rough circle held together with rubber bands. I wrapped it in paper (so the straps wouldn't stick to the body) and put cargo straps around the body and tightened them down. As I tightened the straps the drum pulled itself into a proper circle and the small gaps between the staves disappeared. (and more glue squished out all over everything). Then I went through each join one at a time and made sure the top and bottom were aligned. When I was happy with the alignment I tightened the straps one last time and left it to dry.
First I took the large rubber bands I had used for the shime and wrapped them around staves to hold them together while I assembled all sixteen into the proper positions. Not only does this hold the drum body together while you glue it, etc, it also allows you to look at the body as it will approximately look when it's finished before it's permanent. This, before any glue is applied, is a great time to check for staves of different color that are next to each other that look bad or any other reasons you may want to change the order or flip any of your staves.
Once they were held by the rubber bands I separated them along each join one at a time, running the glue in a bead down along the stave on one side of the gap. Once the glue had spread the whole length of the stave I would press the two together and move to the next.
When I was done I had a whole lot of glue all over everything and sixteen staves in a rough circle held together with rubber bands. I wrapped it in paper (so the straps wouldn't stick to the body) and put cargo straps around the body and tightened them down. As I tightened the straps the drum pulled itself into a proper circle and the small gaps between the staves disappeared. (and more glue squished out all over everything). Then I went through each join one at a time and made sure the top and bottom were aligned. When I was happy with the alignment I tightened the straps one last time and left it to dry.
Sunday, October 23, 2011
The Next Generation
And now for the next round. Now that I've gone through the process a few times, hopefully this new batch will go easier. In addition to some more 'standard' shime (the ones in the middle) I will be constructing some katsugi oke daiko (in the rear) and some smaller sized shime that my daughter has dubbed kawaii shime daiko. (front and on top of standard shime)
Sunday, October 16, 2011
Moving On . . .
How that the drums are starting to pile up (yay!) I guess I'd better figure out what comes next.
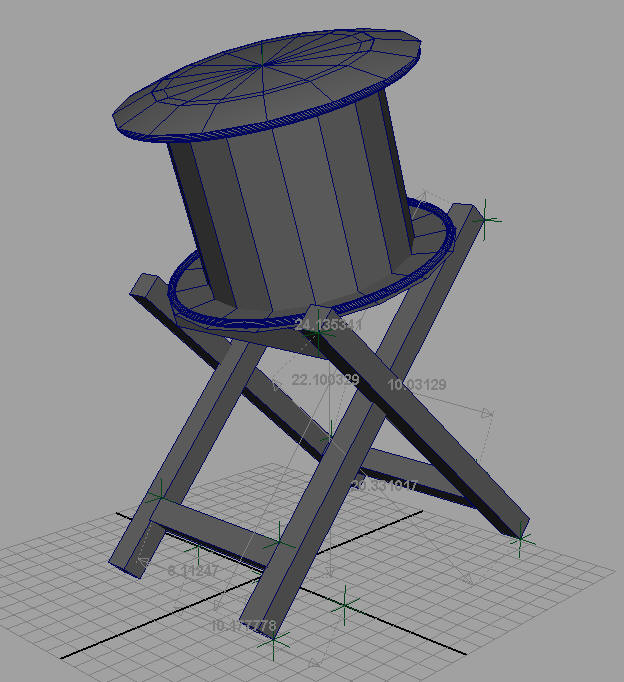
Though the drums are awesome, it's difficult to play them properly while they're sitting in your lap, so I guess it's time for stands. My intent is to play these shime as part of a 'taiko set' with an odeko daiko on one side and a nagado diako on the other, or some similar arrangement, so I want the head of the shime to be on a level with the other drums. I measured a couple of our nagado from floor to top head and designed the shime stands to put the top head at the same height.
As usual, I started with a computer model.
As you can see it's a fairly simple design, so the main purpose the model served was to give me real world dimensions for all of my pieces without my having to do any of the math myself. As the design was fairly simple, construction wasn't difficult and they came together fairly quickly.
I was concerned about strength (we constantly beat on pretty much everything with sticks in taiko) so I doweled all of the joints to re-enforce them.
I didn't stain the stands. I try very hard to use water based finishes whenever possible, and I haven't found a water based stain I like, but I did give them three or four coats of polyurethane to seal the wood and to give them a more finished appearance.
I couldn't decide what I thought would be best to use for padding along the supports under the drum head so I used felt on one, polypropelene on the other. I'll see how they hold up and how well they protect the drum, etc, and decide which to go with on future stands.
Though the drums are awesome, it's difficult to play them properly while they're sitting in your lap, so I guess it's time for stands. My intent is to play these shime as part of a 'taiko set' with an odeko daiko on one side and a nagado diako on the other, or some similar arrangement, so I want the head of the shime to be on a level with the other drums. I measured a couple of our nagado from floor to top head and designed the shime stands to put the top head at the same height.
As usual, I started with a computer model.
As you can see it's a fairly simple design, so the main purpose the model served was to give me real world dimensions for all of my pieces without my having to do any of the math myself. As the design was fairly simple, construction wasn't difficult and they came together fairly quickly.
I was concerned about strength (we constantly beat on pretty much everything with sticks in taiko) so I doweled all of the joints to re-enforce them.
I didn't stain the stands. I try very hard to use water based finishes whenever possible, and I haven't found a water based stain I like, but I did give them three or four coats of polyurethane to seal the wood and to give them a more finished appearance.
I couldn't decide what I thought would be best to use for padding along the supports under the drum head so I used felt on one, polypropelene on the other. I'll see how they hold up and how well they protect the drum, etc, and decide which to go with on future stands.
Saturday, October 15, 2011
ASKA!
I listen to a lot of Taiko (der). I recently ran across this performance from the group ASKA. I added a link to their FaceBook page in the links section. I love their precision and their energy. And fantastic use of a shime!
Some Notes On Shime Building
As with all things, the more you do something the more you learn how to do it well. Shime are no exception. Here are some notes on how the process evolved between drums. I'm sure I will continue to attempt to refine the process as I make more shime in the future.
How you stretch the hides greatly affects not only the tone of the completed shime but also the ease and quality of the stitching and the look of the finished head. There are a lot of factors working against you . . . the hide stretches more in one direction than another, it's difficult to keep the ring centered in the hide . . . the list goes on.
With the first drum I used the "every fifth hole" method Brian described in his excellent Odeko making website (Thanks again Brian!). I felt that, though it stretched well on the ring, the folds in the hide gave me a number of problems when it came time to stitch the hide to the ring. After some thought I gave this new method a try; prior to the actual stretching process I did a "pleating stitch" (fancy name I just made up). I measured out and punched the holes for the stretching line, but instead of Brian's method I ran the line through them in a circular pattern, alternating "top down", "bottom up" though each hole. Now when I pulled the line tight I got evenly spaced "pleats" in the underside of the head that looked something like this.
I pulled this line tight and tied it off to keep the pleats in place. At this point I used a modified version of Brian's stretching method to tighten the hide on the ring, running a line between every fifth pleat. (or as close as I could manage) I want to refine this process some more, putting in the correct number of pleats so that all the rope holes land between the pleats, etc, but this still gave me a more uniform surface on the back of the head and made stitching easier, and more importantly allowed more even and stronger stitches.
And speaking of stitching . . . the first drum I used a regular old "over-under" sort of stitch. It worked just fine, but wasn't necessarily the prettiest or strongest option I could have chosen. So this time I used a stitch that was more of a "two forward, one back" sort of deal. (I'm sure these stitches have names, but I don't know them)
Here are the results:
The more even terrain on the back of the head allowed me to use finer, closer together stitches and I think the two forward one back stitch yielded a more attractive result. That and I got a bit better at this type of sewing after many hours of practice, an unknown number of band-aids, and no few blood sacrifices to the taiko gods.
How you stretch the hides greatly affects not only the tone of the completed shime but also the ease and quality of the stitching and the look of the finished head. There are a lot of factors working against you . . . the hide stretches more in one direction than another, it's difficult to keep the ring centered in the hide . . . the list goes on.
With the first drum I used the "every fifth hole" method Brian described in his excellent Odeko making website (Thanks again Brian!). I felt that, though it stretched well on the ring, the folds in the hide gave me a number of problems when it came time to stitch the hide to the ring. After some thought I gave this new method a try; prior to the actual stretching process I did a "pleating stitch" (fancy name I just made up). I measured out and punched the holes for the stretching line, but instead of Brian's method I ran the line through them in a circular pattern, alternating "top down", "bottom up" though each hole. Now when I pulled the line tight I got evenly spaced "pleats" in the underside of the head that looked something like this.
I pulled this line tight and tied it off to keep the pleats in place. At this point I used a modified version of Brian's stretching method to tighten the hide on the ring, running a line between every fifth pleat. (or as close as I could manage) I want to refine this process some more, putting in the correct number of pleats so that all the rope holes land between the pleats, etc, but this still gave me a more uniform surface on the back of the head and made stitching easier, and more importantly allowed more even and stronger stitches.
And speaking of stitching . . . the first drum I used a regular old "over-under" sort of stitch. It worked just fine, but wasn't necessarily the prettiest or strongest option I could have chosen. So this time I used a stitch that was more of a "two forward, one back" sort of deal. (I'm sure these stitches have names, but I don't know them)
Here are the results:
The more even terrain on the back of the head allowed me to use finer, closer together stitches and I think the two forward one back stitch yielded a more attractive result. That and I got a bit better at this type of sewing after many hours of practice, an unknown number of band-aids, and no few blood sacrifices to the taiko gods.
Monday, October 10, 2011
Assembling the Drum
Well, the bad news is I got so involved in the actual process of putting the heads on the drum that I didn't take the time to take photos while I was doing it. If anyone reading this blog needs to know more gory details, please don't hesitate to contact me and I'll fill in the blanks. (I'm making more drums, after all) The good news is, the drum is finished!
Though I have been braiding leather and tying fancy knots nearly all my life, almost all of my knowledge on lacing drums came from the internet with a very special thanks to Brian's excellent site on making Odeko. I'm drawing up some clear, hopefully easy to follow diagrams on the method I used that I will post here when they're completed. I stretched this first set of heads on the 'first' body, the ten inch tall one. Each head produces a slightly different tone and I'm very happy with how they both sound.
Subscribe to:
Posts (Atom)